Author Topic: Steampunk armoured car  (Read 19465 times)

Offline jcf

  • Global Moderator
  • Turn that Gila-copter down!
Re: Steampunk armoured car
« Reply #25 on: May 24, 2017, 08:10:22 AM »
Nice Andonio.  :) :icon_fsm:

BTW the "ball" is called a cascabel.
“Conspiracy theory’s got to be simple.
Sense doesn’t come into it. People are
more scared of how complicated shit
actually is than they ever are about
whatever’s supposed to be behind the
conspiracy.”
-The Peripheral, William Gibson 2014

Offline andonio64

  • Fio Piccolo's understudy
Re: Steampunk armoured car
« Reply #26 on: May 24, 2017, 11:39:58 PM »
Nice Andonio.  :) :icon_fsm:

BTW the "ball" is called a cascabel.
Thanks JCF, I'll take note of the "cascabel" !
I went a little forward, I hope to show something this weekend...

Antonio

Offline Camthalion

  • The man has done a pink tank...need we say more?!
Re: Steampunk armoured car
« Reply #27 on: May 27, 2017, 07:10:18 PM »
looking cool

Offline andonio64

  • Fio Piccolo's understudy
Re: Steampunk armoured car
« Reply #28 on: May 29, 2017, 04:35:25 PM »
looking cool

Thank you Camthalion !

Offline andonio64

  • Fio Piccolo's understudy
Re: Steampunk armoured car
« Reply #29 on: May 29, 2017, 04:46:20 PM »
Hallo friends,
before going on with the most recent developments on the Gunilla Car, I show you an experiment I did with this "tool":


I bought it from Green Stuff World

It's a set of two rubber moulds to make rivets and studs


I filled it with DAS Modeling clay and after a few hours I had this:


It produces 4 different kinds of objects in 5 different sizes, the smaller is less than 1 mm wide...

I already used them on some detail of the car.

More pictures later

Antonio

Offline andonio64

  • Fio Piccolo's understudy
Re: Steampunk armoured car
« Reply #30 on: May 29, 2017, 05:00:56 PM »
While drinking a cocktail I had an idea: to use the straw bend...


...to make some kind of flexible tubes, and made this


Here is the way it will look like on the back of the car.


The line marked on this piece is where I will cut the plastic to make it fit to the back top of the car.

Antonio

Offline andonio64

  • Fio Piccolo's understudy
Re: Steampunk armoured car
« Reply #31 on: May 29, 2017, 05:03:43 PM »

The main advance on the work was to create a cockpit.
I took an old cordless phone and cut it to make this sort of bathtub where the pilot will operate.


The white cylinder is where the seat will be glued.

Then I made a dashboard, the steering wheel and a board where the pedals will be glued.
The seat is an Albatros DV seat with leather cushion. I plan to make some improvement on this also.


In this view you can see also the new cannons, about 1 cm shorter than the previous ones and both proudly showing their "cascabels".


Antonio

Offline andonio64

  • Fio Piccolo's understudy
Re: Steampunk armoured car
« Reply #32 on: May 29, 2017, 05:16:04 PM »
In the initial design I imagined to put a couple of wings on the back of the car, moved by a system of cogwheels and pulleys. So I purchased a stock of mixed mechanic elements


And with the help of some plasticard I started building the mechanism


This is how (more or less) they'll look like.


The square space in the middle will be covered by the element hosting the straw bend tube. In that element I will put the cogs and pulleys driving the opening of the wings.

Also the wings are part of a wings mix purchased online.
Most of the metal parts you'll see on this build were purchased by the Green Stuff shop quoted above, many pieces (such as the pulleys) are remains from my previous (wooden boats) modeling life.

Thanks for watching!

Antonio

Offline andonio64

  • Fio Piccolo's understudy
Re: Steampunk armoured car
« Reply #33 on: June 03, 2017, 11:21:39 PM »
Hallo, here is a small step ahead I made on the model: the dashboard


Inside the central circle there will be an instrument decal, all the other things were in the packet with cogwheels and instruments.
The central instrument rimming is from an aeroclub setand the red lamp was the on / off indicator from a dismissed portable radio.

The panel will be painted woodgrain and the pedas with their cowling will be in flat aluminum.

The things were just laid on the plastic panel, to see how it ill look like.

This is the real piece:


This is a detail of the steering wheel that will fit in the central holes close to the pedal floor.


Thanks for watching

Antonio


Offline Old Wombat

  • "We'll see when I've finished whether I'm showing off or simply embarrassing myself."
  • "Define 'interesting'?"
Re: Steampunk armoured car
« Reply #34 on: June 04, 2017, 01:00:48 AM »
Small indeed! In fact, tiny! :) :)
"This is the Captain. We have a little problem with our engine sequence, so we may experience some slight turbulence and, ah, explode."

Offline andonio64

  • Fio Piccolo's understudy
Re: Steampunk armoured car
« Reply #35 on: June 04, 2017, 01:17:25 AM »
Thanks OW, yes it's tiny, although it is more or less in 1/32... by the way here's another piece created for the cockpit and laid provisionally at its place...


I am creating the pieces and shaping the body of the car, then I will prime everything and paint then assemble all the part.

I am imagining other details for the cockpit and then I'll finish the wing mechanism and a sort of Tesla engine. Last thing will be detailing the aileron at the back of the car and then I'll start painting and assembling the mani parts.
Before completing the details I will then need to create some pieces under the body to close it where necessary.

There's still a long way stretching ahead... Now I'll go out with my wife for a beer  :icon_beer: :icon_beer:

Thanks for watching!

Antonio


« Last Edit: June 05, 2017, 12:40:51 AM by andonio64 »

Offline Buzzbomb

  • Low Concentration Span, oft wanders betwixt projects
  • Accurate Scale representations of fictional stuff
    • Club and my stuff site
Re: Steampunk armoured car
« Reply #36 on: June 05, 2017, 07:43:22 AM »
boodiful.. loving this

Offline andonio64

  • Fio Piccolo's understudy
Re: Steampunk armoured car
« Reply #37 on: June 05, 2017, 12:23:06 PM »
boodiful.. loving this

Thanks Buzzbomb!

Offline andonio64

  • Fio Piccolo's understudy
Re: Steampunk armoured car
« Reply #38 on: June 12, 2017, 02:11:33 AM »
Hallo!
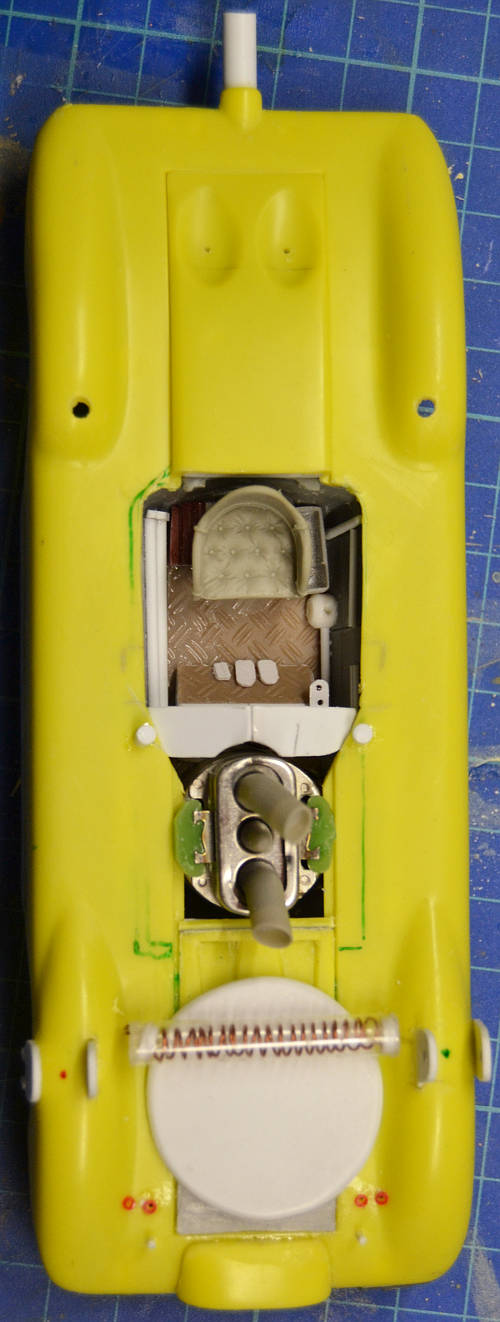
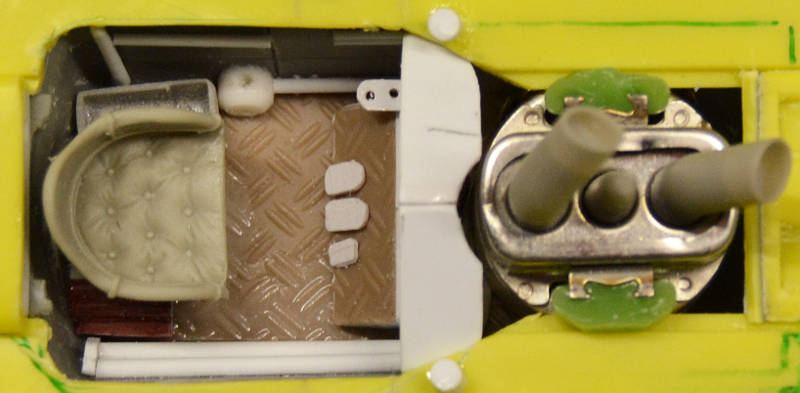
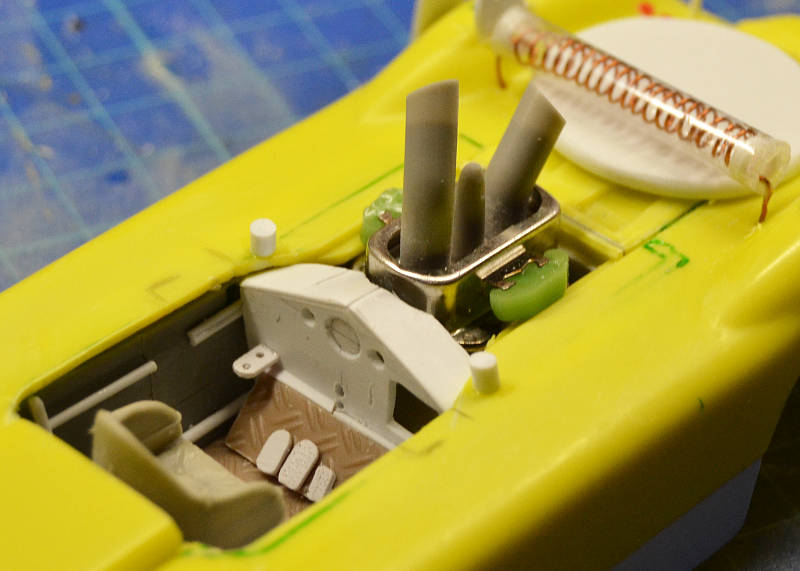
During the weekend I worked on the engine, I selected some electrical relicsI have in my huge scrapbox, don't remember from which devices they come from...

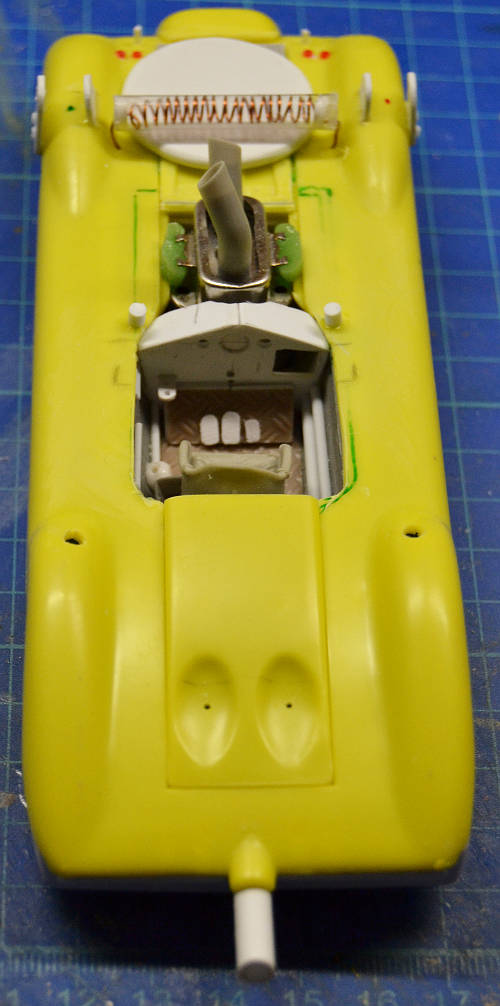
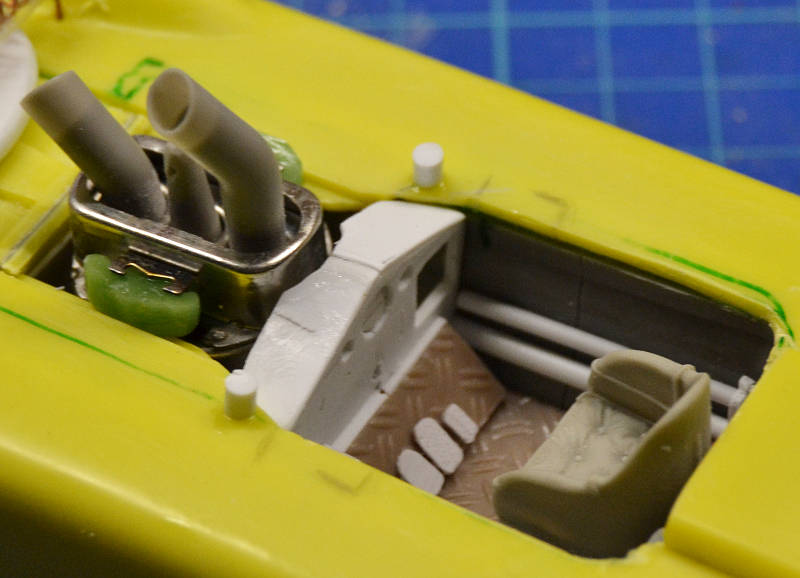
After mounting the engine (along with its exhausts - or maybe they are air intakes?) I noticed the pieces I had adopted as windshield was not useful any more so I have to change and create a different one.

Some tubing and other small details were added to the dashboard.

A fantastic copper wire spiral in its glass tube was added to the front of the car.

In these pictures you see also the way the back piece fits in the whole design.

Now I think the cockpit is finished and the forward half as well.

Next I will take care of the wing movement mechanisms and then the aileron with its lamp.

To you the pics:


Thanks for watching

Antonio

Offline Brian da Basher

  • He has an unnatural attraction to Spats...and a growing fascination with airships!
  • Moderator
  • *
  • Hulk smash, Brian bash
Re: Steampunk armoured car
« Reply #39 on: June 15, 2017, 06:25:42 AM »
I really like your details and am most impressed by your use of flexi-straws (those things have many uses)!

Those pipes sure look every bit the business too!

Brian da Basher

Offline andonio64

  • Fio Piccolo's understudy
Re: Steampunk armoured car
« Reply #40 on: June 15, 2017, 09:38:37 PM »
Thank you Brian!
I am now working on the windshield and a couple more of details to be put in the cockpit, they'll be glued after the cockpit will be painted.

I have also selected cogwheels to build the mechanism to move the wings, I think I'll sort them out in the weekend.

Pictures will come in the weekend....

Sorry for being so slow!!!

Antonio

PS: How would you glue metal pieces to plastic? Do you think CA Glue is OK?

Offline Old Wombat

  • "We'll see when I've finished whether I'm showing off or simply embarrassing myself."
  • "Define 'interesting'?"
Re: Steampunk armoured car
« Reply #41 on: June 15, 2017, 10:38:06 PM »
CA is OK but a 2-part epoxy might be a better long term solution.
"This is the Captain. We have a little problem with our engine sequence, so we may experience some slight turbulence and, ah, explode."

Offline andonio64

  • Fio Piccolo's understudy
Re: Steampunk armoured car
« Reply #42 on: June 15, 2017, 10:44:34 PM »
CA is OK but a 2-part epoxy might be a better long term solution.

Thanks OW, I will look for a 2-part epoxy in a near hardware shop...

Antonio

Offline jcf

  • Global Moderator
  • Turn that Gila-copter down!
Re: Steampunk armoured car
« Reply #43 on: June 16, 2017, 12:37:40 AM »
Note that epoxy when cured will have a tendency to 'pop-off' of smooth plastic parts,
so be sure to rough up where you want to attach the metal bits to give the surface
a 'tooth', ditto the metal bits.
“Conspiracy theory’s got to be simple.
Sense doesn’t come into it. People are
more scared of how complicated shit
actually is than they ever are about
whatever’s supposed to be behind the
conspiracy.”
-The Peripheral, William Gibson 2014

Offline andonio64

  • Fio Piccolo's understudy
Re: Steampunk armoured car
« Reply #44 on: June 16, 2017, 01:52:05 AM »
Note that epoxy when cured will have a tendency to 'pop-off' of smooth plastic parts,
so be sure to rough up where you want to attach the metal bits to give the surface
a 'tooth', ditto the metal bits.

Oh, thanks jcf, that may be a problem, the plastic surface is very smooth and I should paint it glossy black so the rough would appear very much.

I will post a photo to show what the metal piece looks like... maybe it could help!

Antonio

Offline andonio64

  • Fio Piccolo's understudy
Re: Steampunk armoured car
« Reply #45 on: June 16, 2017, 02:05:43 AM »
This is the metal decoration:


And it should go where the white belt is on the sides of the car


Thanks

Antonio

Offline jcf

  • Global Moderator
  • Turn that Gila-copter down!
Re: Steampunk armoured car
« Reply #46 on: June 16, 2017, 02:14:09 AM »
For something that intricate and light-weight I'd been inclined to use a good quality spray-adhesive.
Lay the filigree face down on a piece of cardboard, spray on a light coat of the adhesive, let it
dry slightly/go tacky and apply it to the painted surface.
“Conspiracy theory’s got to be simple.
Sense doesn’t come into it. People are
more scared of how complicated shit
actually is than they ever are about
whatever’s supposed to be behind the
conspiracy.”
-The Peripheral, William Gibson 2014

Offline andonio64

  • Fio Piccolo's understudy
Re: Steampunk armoured car
« Reply #47 on: June 16, 2017, 02:21:54 AM »
Thank you jcf, this is a great tip!

Offline Old Wombat

  • "We'll see when I've finished whether I'm showing off or simply embarrassing myself."
  • "Define 'interesting'?"
Re: Steampunk armoured car
« Reply #48 on: June 16, 2017, 10:11:50 AM »
For something like that I've gotta agree with Jon. :)
"This is the Captain. We have a little problem with our engine sequence, so we may experience some slight turbulence and, ah, explode."

Offline andonio64

  • Fio Piccolo's understudy
Re: Steampunk armoured car
« Reply #49 on: June 18, 2017, 09:14:40 PM »
Today I worked on the wings movement mechanism:


Two vertical cogwheels come out from the body and engage two horizontal cogwheels bound to pulleys.
On the pulleys there will be cables connecting to the pulleys bound to the wings, see red marks on this photo:


I also glued some ribs on the aileron:


This is the new windshield


Two new details to be put in the cockpit (done in the last days):


Thanks for watching

Antonio