Author Topic: RAAF F-4-1-LO Lightning A55-3 1PRU 1943 - complete  (Read 17516 times)

Offline trickyrich

  • The Resin Casanova
  • now if I just had time to finish all my projects!!
RAAF F-4-1-LO Lightning A55-3 1PRU 1943 - complete
« on: April 29, 2015, 12:27:55 PM »
Well after what seems to be ages I’m back on these pagers this time with a build!

I am currently hosting a single type group build on another site for the P-38 Lightning, so thought I’d share this build here as well.

Being someone who likes to do things a bit different, I found an unusual aircraft for my build. It turns out the RAAF operated 3 PhotoRecon P-38’s (L-4-1-LO’s for the recon aircraft designations) during the war which was operated by 1PRU plus they were loaned a few more by the USAAF. There is a bit of conjecture over whether the original 3 aircraft supplied were F-4s or started as P-38E’s that were modified either in the US or here in Australia to F-4’s. These 3 aircraft operated from Mid 42 to late 44, with all being eventual written off, with one incident resulting in the lost of the pilot.
 
I will be building (well hope to) the last of the 3, A55-3, she started off life as a P-38E with the serial number 41-2144 (there was even for a while some conjecture as to if this serial number was correct.), she was converted to F-4-1-LO either here in Australia or in the US (again not confirmed either way). She served with 1PRU from 27Feb42 till she crashed due to undercarriage failure in 10Dec43, the wreckage is now in the Darwin Aviation Museum


The plan is to use Academy's 1/48th P-38F (recommended...now wishI had used the Hasegawa on) with Red Roo's conversion kit.


As usual I got a bit carried away with “extras” for this build......., though the new resin bits are lovely and much better the kit bits!


The PE bits are actually for the Hasegawa model and not the Academy one, I didn’t think there would be too much difference and could use most of them.......that was the original idea but that didn’t quite go to plan.......more on that as we go.

I had originally thought for some season these aircraft were painted in the “Haze” colour schemes there USAAF aircraft were but luckily they weren't.......I wasn't looking forward to trying to paint that!!

I’m not sure which came first the idea for this or the Boomerang, but as a result of both I now have a desire to build a few more of the slightly less known aircraft use by the RAAF in WWII, so I have in the wings a P-39 Airacobra, P-43 Lancer, and possibly a Buffalo?

I have made good progress into this build but rather than making the initial thread enormous, I well break it up into bits, similar to what I had already posted. Enjoy.
« Last Edit: July 14, 2015, 12:57:20 PM by trickyrich »

Offline Tophe

  • He sees things in double...
  • twin-boom & asymmetric fan
    • my models
Re: RAAF F-4-1-LO Lightning A55-3 1PRU 1943
« Reply #1 on: April 30, 2015, 02:14:26 AM »
I’m not sure which came first the idea for this or the Boomerang, but as a result of both I now have a desire to build a few more of the slightly less known aircraft use by the RAAF in WWII, so I have in the wings a P-39 Airacobra, P-43 Lancer, and possibly a Buffalo?
Interesting. Will you mix these kits into hydrids of your own? That would be even more interesting (according to me, but feel free to think differently) ;)

Offline GTX_Admin

  • Evil Administrator bent on taking over the Universe!
  • Administrator - Yep, I'm the one to blame for this place.
  • Whiffing Demi-God!
    • Beyond the Sprues
Re: RAAF F-4-1-LO Lightning A55-3 1PRU 1943
« Reply #2 on: April 30, 2015, 03:03:13 AM »
I have an article here on the RAAF Recon Lightnings if you are interested.
All hail the God of Frustration!!!

You can't outrun Death forever.
But you can make the Bastard work for it.

Offline trickyrich

  • The Resin Casanova
  • now if I just had time to finish all my projects!!
Re: RAAF F-4-1-LO Lightning A55-3 1PRU 1943
« Reply #3 on: April 30, 2015, 06:58:50 AM »
I have an article here on the RAAF Recon Lightnings if you are interested.

I'd be interested in anything you've got, have spent the last three work swings trying to get as much info as I can on them. Got quite a bit but would love to see some more, thanks.

Offline GTX_Admin

  • Evil Administrator bent on taking over the Universe!
  • Administrator - Yep, I'm the one to blame for this place.
  • Whiffing Demi-God!
    • Beyond the Sprues
Re: RAAF F-4-1-LO Lightning A55-3 1PRU 1943
« Reply #4 on: May 01, 2015, 04:39:57 AM »
Let me see what I can do this weekend.
All hail the God of Frustration!!!

You can't outrun Death forever.
But you can make the Bastard work for it.

Offline GTX_Admin

  • Evil Administrator bent on taking over the Universe!
  • Administrator - Yep, I'm the one to blame for this place.
  • Whiffing Demi-God!
    • Beyond the Sprues
Re: RAAF F-4-1-LO Lightning A55-3 1PRU 1943
« Reply #5 on: May 01, 2015, 04:43:01 AM »
BTW, here is another view (the bottom one) of A55-3:

All hail the God of Frustration!!!

You can't outrun Death forever.
But you can make the Bastard work for it.

Offline trickyrich

  • The Resin Casanova
  • now if I just had time to finish all my projects!!
Re: RAAF F-4-1-LO Lightning A55-3 1PRU 1943
« Reply #6 on: May 02, 2015, 04:01:17 PM »
Thanks, I've got these, this was what originally scared me, the Haze paint job.....but after reading more about the RAAF Lightnings I new I had to do one of the three camouflaged ones.

Ok was the first update for this build after about two days work, a lot of which was fixing obvious errors with the model.

Oh and I was playing around with a new Macro lens so the photos arn’t quite up to my usual.
 
All the resin bits were removed from their mounting blocks and given a good wash. I can’t say how much I like the Aries cockpit is amazing, way better than any PE bits could make a cockpit look! The initial coat of Zinc Chromate looked a bit bright but with detailing and weathering ot toned down quite nicely, as can be seen on photos in next instalment.


The Quickboost supercharges are really nicely detailed, a vast improvement to the kit ones.


The basic models wheel well detail is not that great so I decided to add some PE detail to them. There isn’t a PE set for this model (well I couldn’t find one…..) so I used the set for the Hasegawa model. I should have seen this should have been a bit of a warning for what was to come next!  There is a bit of a difference between the two models of cause. So a few hours later after much cursing I managed to get the bits to fit….sort of! In the end the amount that can been seen once finished probably means it wasn’t really worth it.


But this was a bit of a warning for what was to come!!!
 
The cowling intakes were rounded blanked off holes and looked terrible, these were drilled out. I may extend the depth of these a little before fitting some nice PE grills on them. There is a small inlet between and above them, this should have been much lower and its fairing slightly protruding into the openings. It’s clearly not here, I only discovered it later. I’m not sure whether to fix this or not, it’s pretty minor, but now I know it’s wrong it’ll bug me. We’ll see what happens.


Next to be attached was the radiator scoops on the booms, I planned to fit the exit PE doors along with fitting the radiator grills to add a bit of detail that was missing. The inlets were extremely poor and needed quite a bit of work to open them up to their correct size and shape. If the front openings were bad the rears were complete and utter cr@p! The whole look of them was wrong and the exit flap doors were way too small, so some major surgery was needed to sort this out. Plus there were also no interiors to the radiators so I quickly made some out of card. It’s not perfect by any means but at least now it looks like the real thing with no gaping hole!


I was sort of toying around with the idea of opening up the camera bays (well boxing them up) so I could fit cameras, figured you should at least be able to see the camera lens through the windows. But time with hosting this GB and another plus the fact that in most photos you can’t see the lens has made me decided to leave well enough alone….I have enough to do as it is.


Next update, fun with the cockpit.
 
Oh and this arrived, Classic Airframes 1/48 P-43 Lancer, which I’m very excited about it, the RAAF used (or attempted to) six of these as Photo-Recon aircraft with 1PRU before they were replaced by the Lightning’s. So we can already guess the colour scheme for this baby…….just need some time or another GB!


Offline elmayerle

  • Its about time there was an Avatar shown here...
  • Über Engineer...at least that is what he tells us.
Re: RAAF F-4-1-LO Lightning A55-3 1PRU 1943
« Reply #7 on: May 03, 2015, 08:43:07 AM »
Looking good and I think you made the right decision.  This does suggest an interesting whif to me, a low-altitude high-speed recce machine based on the non-turbosupercharged Lightning variant the RAF ordered and then didn't use.

Offline trickyrich

  • The Resin Casanova
  • now if I just had time to finish all my projects!!
Re: RAAF F-4-1-LO Lightning A55-3 1PRU 1943
« Reply #8 on: May 03, 2015, 09:22:13 AM »
Someone in my GB showed a Spitfire they were building as well (that wasn't part of any GB), and it got me thinking of a RR Merlin powered Lightning! Maybe with the radiator scoops on top of the booms? Would have given the Lightning a bit more grunt!!!

Offline GTX_Admin

  • Evil Administrator bent on taking over the Universe!
  • Administrator - Yep, I'm the one to blame for this place.
  • Whiffing Demi-God!
    • Beyond the Sprues
Re: RAAF F-4-1-LO Lightning A55-3 1PRU 1943
« Reply #9 on: May 03, 2015, 09:26:01 AM »
Some I did a while back with RR Griffons:

RR Griffon engined with turbocharger:


And with Supercharger:

All hail the God of Frustration!!!

You can't outrun Death forever.
But you can make the Bastard work for it.

Offline elmayerle

  • Its about time there was an Avatar shown here...
  • Über Engineer...at least that is what he tells us.
Re: RAAF F-4-1-LO Lightning A55-3 1PRU 1943
« Reply #10 on: May 03, 2015, 09:45:42 AM »
The Griffon would be easy to plumb for the turbocharger since it, like the Allison, has a downdraft intake.  A Lightning I (Lockheed Model 322) without the turbochargers would be a good subject for fitting Merlins, provided the production of Merlins could support that.

Offline trickyrich

  • The Resin Casanova
  • now if I just had time to finish all my projects!!
Re: RAAF F-4-1-LO Lightning A55-3 1PRU 1943
« Reply #11 on: May 03, 2015, 11:06:45 AM »
nice!!! 

Please stop giving me ideas, as I think I have builds planned for the next 10 years!!  ;D

Offline kitnut617

  • Measures the actual aircraft before modelling it...we have the photographic evidence.
  • Holding Pattern
  • *
  • I'd rather be dirtbike riding...
Re: RAAF F-4-1-LO Lightning A55-3 1PRU 1943
« Reply #12 on: May 03, 2015, 09:31:36 PM »
The Griffon would be easy to plumb for the turbocharger since it, like the Allison, has a downdraft intake.  A Lightning I (Lockheed Model 322) without the turbochargers would be a good subject for fitting Merlins, provided the production of Merlins could support that.


The Griffons fitted to the Spitfire had updraft throttle bodies Evan, Greg's profile is showing a Spitfire cowling ---  The intake was under the fuselage/cowling.  But as far as I'm aware the only Rolls Royce engine (Merlin & Griffon) that had a downdraft throttle body were the Merlins fitted to the DH Hornet as the air intake for that aircraft were in the outer wing leading edges and fed into the under-slung engine nacelles from the top.  The Packard equivalents had updraft throttle bodies though (P-51H & P-82B) ----   

UPDATE (later) -- I found a photo of the Mustang Reno racer Precious Metal's Griffon engine. This aircraft used an old Shackleton engine but had a modified air intake system. It was modified to have a downdraft throttle body but it's the only one to have that done.

http://i.imgur.com/piTeVEY.jpg
« Last Edit: May 04, 2015, 12:39:12 AM by kitnut617 »

Re: RAAF F-4-1-LO Lightning A55-3 1PRU 1943
« Reply #13 on: May 05, 2015, 06:41:59 PM »
Some I did a while back with RR Griffons:

RR Griffon engined with turbocharger:

And with Supercharger:


Any chance (pretty please) of these turning up in plastic one day  :-*
Were going to be finished in 2020 BEFORE I start any da*!#d new ones - Maybe When Hell Freezes Over - again? - CF-IDS Wolverine; Douglas Mawson; Bubba Wants a Fishin' Rig; NA F-100

Against the Wall - Maton Dreadnought; Fender Telecaster; Epiphone Les Paul Stud

Offline kitnut617

  • Measures the actual aircraft before modelling it...we have the photographic evidence.
  • Holding Pattern
  • *
  • I'd rather be dirtbike riding...
Re: RAAF F-4-1-LO Lightning A55-3 1PRU 1943
« Reply #14 on: May 06, 2015, 12:24:07 AM »
Some I did a while back with RR Griffons:

RR Griffon engined with turbocharger:

And with Supercharger:


Any chance (pretty please) of these turning up in plastic one day  :-*


I just had a look to see what would be involved, side view it looks possible, top view though the Spitfire/Seafire cowling is quite a bit narrower so some major surgery is needed to blend things in.  Personally, I would use a Firefly Mk.IV cowling which is as wide as the P-38 cowling where the engine is.  However, Greg has placed the engine quite a bit further forward too ----
« Last Edit: May 06, 2015, 12:27:22 AM by kitnut617 »

Offline GTX_Admin

  • Evil Administrator bent on taking over the Universe!
  • Administrator - Yep, I'm the one to blame for this place.
  • Whiffing Demi-God!
    • Beyond the Sprues
Re: RAAF F-4-1-LO Lightning A55-3 1PRU 1943
« Reply #15 on: May 06, 2015, 02:58:22 AM »
Warning:  many of my sketches have been done with little, if any, engineering thought given as to practicalities.  Attempts to replicate in 3D may result in mental damage. ;)
All hail the God of Frustration!!!

You can't outrun Death forever.
But you can make the Bastard work for it.

Offline Jeffry Fontaine

  • Unaffiliated Independent Subversive...and the last person to go for a trip on a Mexicana dH Comet 4
  • Global Moderator
  • His stash is able to be seen from space...
Re: RAAF F-4-1-LO Lightning A55-3 1PRU 1943
« Reply #16 on: May 06, 2015, 03:10:45 AM »
Warning:  many of my sketches have been done with little, if any, engineering thought given as to practicalities.  Attempts to replicate in 3D may result in mental damage. ;)

Which is Greg's way of saying that some things look really good on paper :)

Your WIP so far is looking very nice!  Always good to see a reconnaissance aircraft on the work bench. 
"Every day we hear about new studies 'revealing' what should have been obvious to sentient beings for generations; 'Research shows wolverines don't like to be teased" -- Jonah Goldberg

Offline kitnut617

  • Measures the actual aircraft before modelling it...we have the photographic evidence.
  • Holding Pattern
  • *
  • I'd rather be dirtbike riding...
Re: RAAF F-4-1-LO Lightning A55-3 1PRU 1943
« Reply #17 on: May 06, 2015, 04:19:21 AM »
Warning:  many of my sketches have been done with little, if any, engineering thought given as to practicalities.  Attempts to replicate in 3D may result in mental damage. ;)

 ;D ;D ;D  like we're not already ------

Offline trickyrich

  • The Resin Casanova
  • now if I just had time to finish all my projects!!
Re: RAAF F-4-1-LO Lightning A55-3 1PRU 1943
« Reply #18 on: May 06, 2015, 01:03:39 PM »
Ok time for another instalment on this build.

Thank you one and all for trying to distract me even more than usual......I now would sooo love to build a RR powered Lightning in RAAF colours of cause, that it’s been filed away into the Future Whif folder!

Ok back to the beast.........
 
I had at this stage made quite a bit of progress though most of it is modifying or more like fixing up errors….and I thought this was going to be a simple build!!
 
I am quite glad the undercarriage bays are not going to be normally seen, as they aren’t very good on this model. The PE bits help and sort of fit (I know they weren’t designed for this model) but the walls of the wheel wells are way too thick when fitted into the booms, only major surgery could fix this and major time waste as well! There’s practically not colour in these bays other than silver/aluminium, I’ll fiddle a bit more with them to try and give them a dirty used look but not much else. You can just see there is a pin in the outside walls, I had to pin the main gear as I used PE sidewalls and there was nothing for the plastic gear legs to glue onto. This will, I hope, give it a much stronger join and will be less troublesome in the long run.


The new resin nose has been glued together and roughly shaped and given a coat of undercoat to see what needs to be done. Overall it’s not too bad, just a little bit of tiding up and filling and it will be sorted. I would love to fit cameras in it but it will take up too much time for what would be seen. If I was making this for a competition or such I probably would, not too much work just time consuming.


The exit flaps for the cowling scoops is completely wrong, they’re way too big and the inner duct is wrong as well, well actually completely missing. So using the PE flap as the guide it was out with the heavy-duty grinders and sandpaper!


A short time later its complete (well almost will tidy it up a little bit more), it looks so much better and how it should! I may black off the interior as there is a big open cave inside but it won’t normally be seen. Again it will depend on time as to how much more I will do on it.


The lower engine cowlings seem to have fitted quite nicely without too many dramas and only a gap along the rear edges, which is an easy fix. As you can see I added a couple of bits of card to help align these to the booms, highly recommended this for anyone building one of these, will save you lots of unnecessary filling and alignment issues!


What is noticeable is the small opening above the two main inlets. This is in the wrong place, it needs to be much lower and the sidewalls for it actually protrude into the main openings. This is bugging me more each time I look at it so I’m going to have to fix this....just two annoying! It should be fairly simple fix, fill in the original hole and drill and fit a piece of plastic tubing in the correct position....well that’s the theory.........

I am quite pleased with the progress so far even with all the correction modifications, which it needed.

Next time the cockpit is fitted and the wings go together.

Re: RAAF F-4-1-LO Lightning A55-3 1PRU 1943
« Reply #19 on: May 06, 2015, 10:42:50 PM »
Warning:  many of my sketches have been done with little, if any, engineering thought given as to practicalities.  Attempts to replicate in 3D may result in mental damage. ;)

 ;D ;D ;D  like we're not already ------

Hmm .... can't take healthy brain cells with you when you're dead I guess soooooo ..... this one is now in the 'to do list' (i.e. irritate the missus with more plastic) pile  ;D were I put that ole Fireflies  :-\ :-\ :-\
Were going to be finished in 2020 BEFORE I start any da*!#d new ones - Maybe When Hell Freezes Over - again? - CF-IDS Wolverine; Douglas Mawson; Bubba Wants a Fishin' Rig; NA F-100

Against the Wall - Maton Dreadnought; Fender Telecaster; Epiphone Les Paul Stud

Offline trickyrich

  • The Resin Casanova
  • now if I just had time to finish all my projects!!
Re: RAAF F-4-1-LO Lightning A55-3 1PRU 1943
« Reply #20 on: May 17, 2015, 03:56:00 AM »
Well this is the last instalment before I head back home, this break will only be a short one for me, so the plan is with luck to get her undercoated before I head back to work.
 
Getting it all to fit was another matter all together and the non-breaking run soon finished there! I had to sand the floor of the cockpit to near paper thin to get it to fit, plus the instrument panel/cowling is a bit high, so need to drop that down a wee bit.

Of cause I forgot to take photos when I did this, but will add these into the next instalment.

 Amongst other bits I have lost in this process was one of the tiny throttle handles, no show of finding that piece, guess that’s why Eduard supplies lots of spares. It doesn’t quite look as good now in the photos as there is lots of dust in the cockpit area now….cleaning to be done! Plus I think I may have lost another one of those rotten throttle levers!


I cleaned up the join on the lower section of the cowls as well as re-scribed some to the panel lines on the booms.
 
I just taped together to see how  she would look, its starting to look the part, there will be a little bit of work to get the nose to fit correctly but that shouldn't take too long.


The original wheels are a bit crap so I have bought some Ultra Cast Diamond patterns ones which should look great. All the modification and correction work is pretty well done, as I mentioned earlier I have to fix the position of that small intake (between the oil cooler intakes), that should be a quick job. The booms test fit quite nicely so I’m not expecting any dramas there.  So with luck on this break I may get to a stage where I can paint her, or at least the undercoat her.

Next time fit everything together and undercoat........maybe!

Offline trickyrich

  • The Resin Casanova
  • now if I just had time to finish all my projects!!
Re: RAAF F-4-1-LO Lightning A55-3 1PRU 1943
« Reply #21 on: May 21, 2015, 03:37:58 PM »
Well I’m finally back to this one but unfortunately I wouldn’t be able to get too much done this break, looks like another GB that will go right down to the wire, worst part is I’m the host!

Not too many photos but a lot of work has been done. I left this with the fuselage/wings being glued together…after three weeks they would have definitely have dried! The tape had even gone hard, so a quick clean up of the joins and next the nose.

They had some rather large location lugs on the resin nose, which actually didn’t help as they got in the way profiling and tiding up the joint to the fuselage, so off they went. This allowed the nose to be custom fit correctly to the main fuselage, I actually got a nice join so was happy with this. The only bit of real work required was a small bit of shaping to get the profiles to match. Oh yeah I also added quite a bit of weight to stop it from sitting on its tail.


It will look better once the panel lines are done and a final polish up.

Next was that tiny intake in the nose cowls, it wasn’t actually as easy as I hoped and in the end I bailed on what I had originally planned, though this was after I had drilled the larger holes! So I have made myself some extra work I didn’t need, will tidy up what I have done and drill the intake hole in the correct position!


The pods were new fitted along with the tail. This too required a lot of test fitting and shaping until I got a good fit. Most of the joins were good with just a small bit of filler used in a couple of areas. There were though some bad gaps and miss alignments, these were fix using a couple of methods, for gaps either thin plastic strips or stretched sprue was used to fill the hole. For the section that was misaligned stretched sprue was used to build up the hollow area, which will be sanded back once completely dry. I prefer using sprue to filler as you get less mess, easier to clean-up/shape and you end up with a nice smooth plastic area.


She’s certainly looking the part now! All that needs doing now is re-scribing of panel lines, a job I hate! Then it’s on to painting…with luck!


As mentioned this will be all I can do this break, off tomorrow out west to RAAF base Wagga Wagga, off to visit junior, he’s doing his Army Aircraft Mechanics course there, I was there 32 years earlier doing my fitter course!

Offline Brian da Basher

  • He has an unnatural attraction to Spats...and a growing fascination with airships!
  • Moderator
  • *
  • Hulk smash, Brian bash
Re: RAAF F-4-1-LO Lightning A55-3 1PRU 1943
« Reply #22 on: May 24, 2015, 09:42:57 PM »
That's some A #1 detail work on the 'pit!

Sure looks like a winner! Looking forward to seeing more!

Brian da Basher

Offline trickyrich

  • The Resin Casanova
  • now if I just had time to finish all my projects!!
Re: RAAF F-4-1-LO Lightning A55-3 1PRU 1943
« Reply #23 on: July 02, 2015, 08:41:47 PM »
ok I'm back after a longer period than normal, finished my shift then took the wife away to Singapore for a week....I love that place.

Well as always it's a bit hard to get back into it but I have to try unfortunately I won’t get this one finished in time for the GB but will push on anyway.

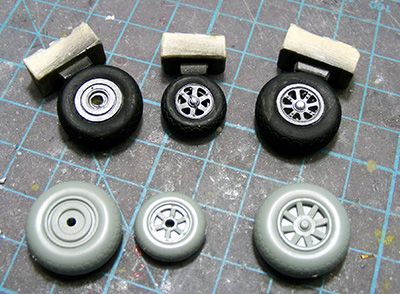
Waiting for me when I got home was a nice set of Ultracast wheels, which look much better than the kit ones!


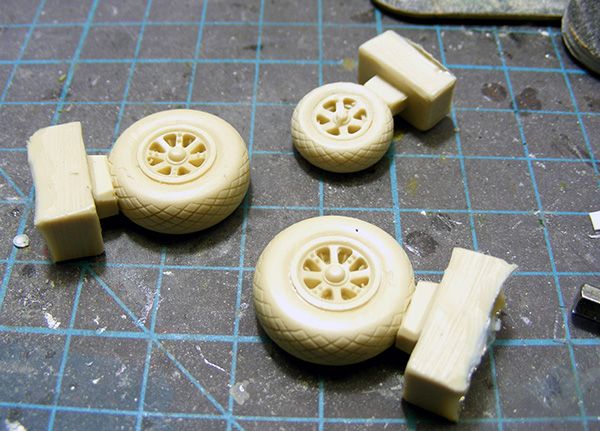
 The wheels are nearly there and the new ones look so much better.


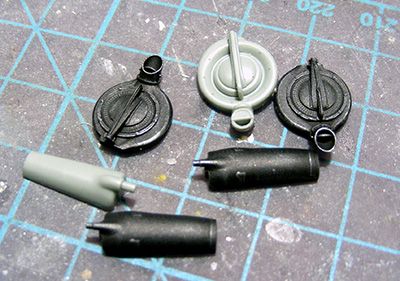
…same with the Turbo bits!


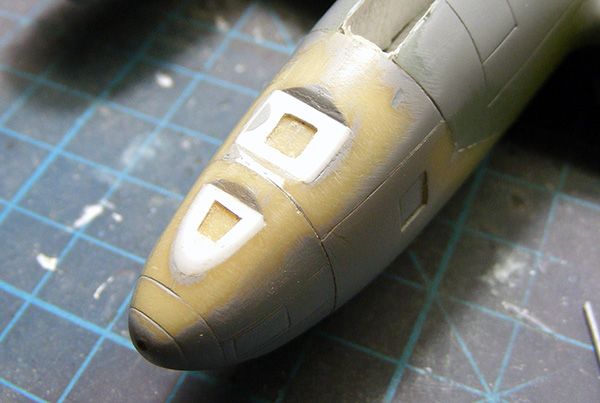
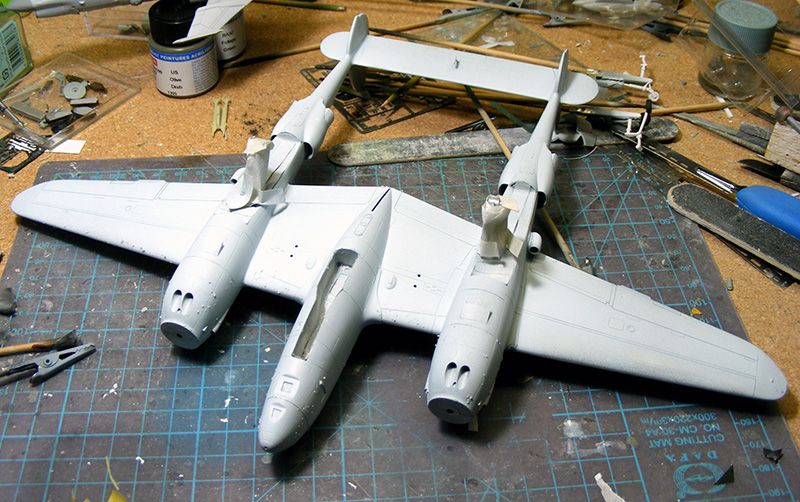
I have pretty much finished with the cowling mod/correction, it’s better than it was but with time……


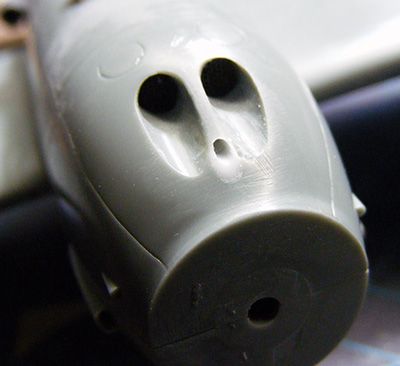
The nose section camera openings were not clearly defined so rather then cutting into resin and hoping to get nice clean openings, the opening were made into 5 thou sheet then glued to the nose. Much better solution and what is recommended, just a wee but of tidy up to do.


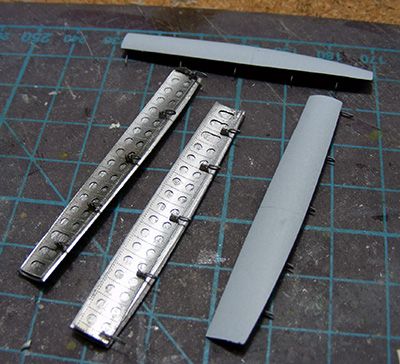
I threw away the Montex canopy masks as they didn’t fit, they were made for the Hasegawa version and I thought they might fit…was I wrong, none of them fitted! Makes me wonder how far out the Academy canopy is out??  So out with the Tamiya masking tape and new masks made…..after I totally stuffed up the side panels. They have the cross bars, which I thought were even top and bottom, but as it turns out they’re not. I discovered this after I finished one. And of cause I had used a fresh scalpel, so nice clean deep lines in the wrong place!! Not happy, but not much I can do now, I’ll just have to see if I can hide it some how.


Fitted the internal PE bits the undercarriage doors, they of cause didn’t quite fit but look ok painted.


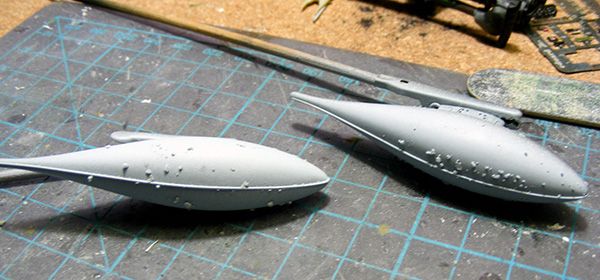
The drop tank with salt and in the middle of painting.


Finished off all the sanding bits and prepped her for painting. First on the pre-shading, which turned out to be a bit of a waste of time as once I had applied the next coat of aluminium you really couldn’t notice the difference!


Once the aluminium was on I found a couple of joins that needed a little bit more work, they were quickly sorted and touched up.
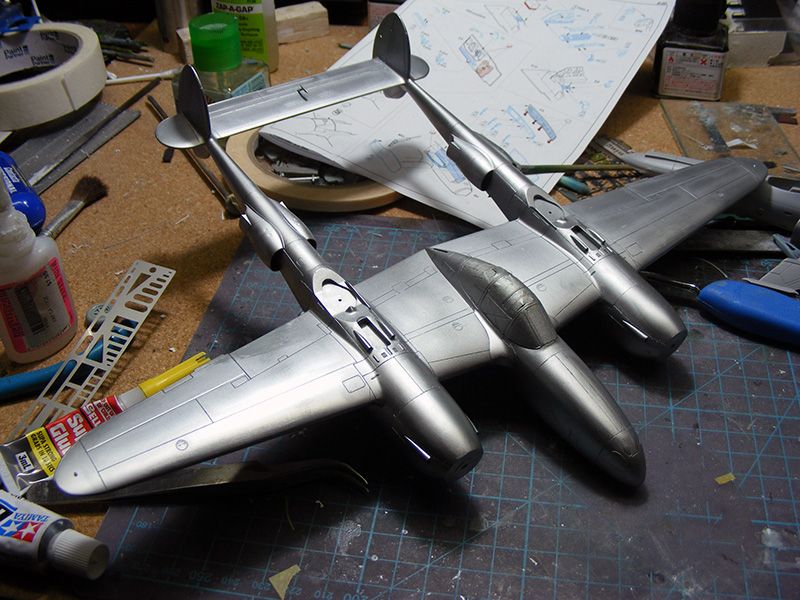


I also decided to try out the “salt chipping” method on this model, so salt was applied….just have to see how it turns out!

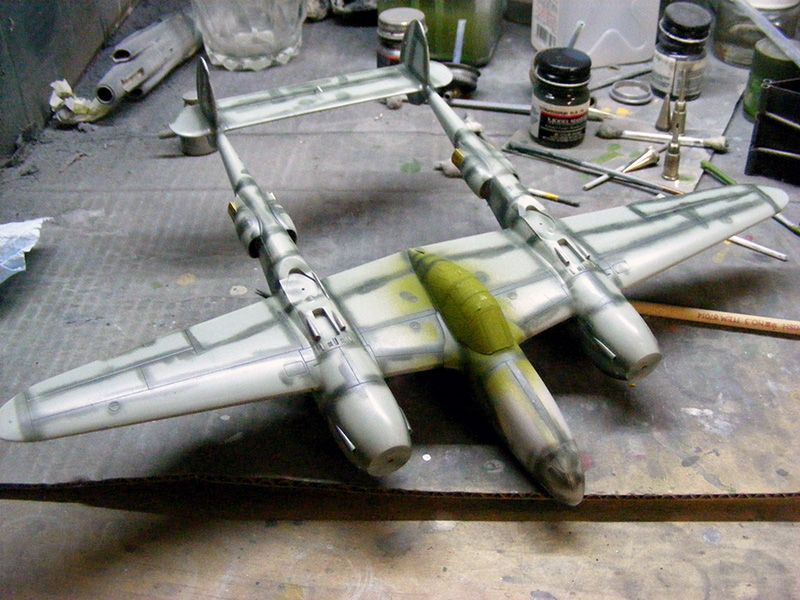
Now the main colours, I went for a new acrylic paint for this model, Lifecolor. I have read some good stuff about this paint, plus they have a range of RAAF colour available in two packs…which of cause I had to get.

First the under surfaces, these are Sky Blue. I made a slight mistake in thinning the paint, as in not enough (I had read you need to be a bit careful in getting the mix right), and it didn’t go on quite as I had hoped. But looking at it this morning it does look nice…maybe a very light touch-up required here and there.


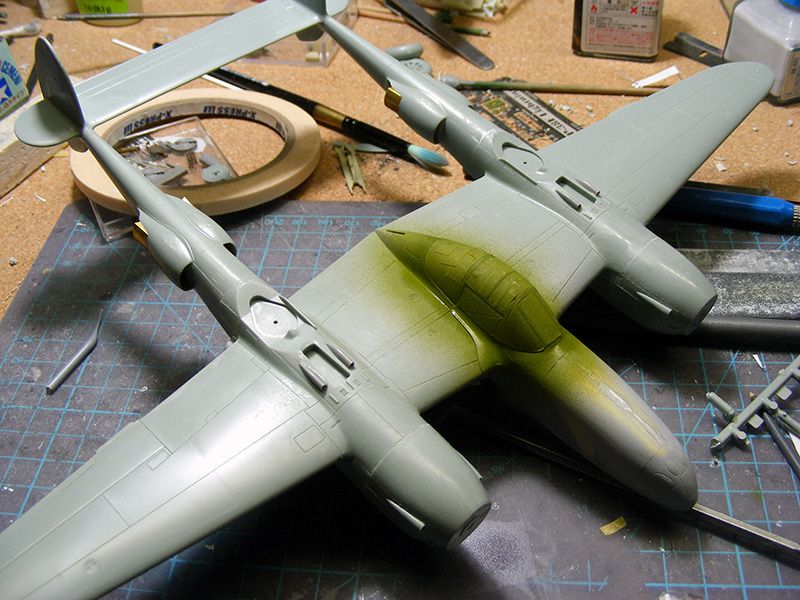
Next up the upper surfaces, Olive Drab and Foliage Green, have them nicely thinned so hopefully no issues!

Next time painting fun!!!

Offline Tophe

  • He sees things in double...
  • twin-boom & asymmetric fan
    • my models
Re: RAAF F-4-1-LO Lightning A55-3 1PRU 1943
« Reply #24 on: July 04, 2015, 12:58:34 PM »
Warning:  many of my sketches have been done with little, if any, engineering thought given as to practicalities.  Attempts to replicate in 3D may result in mental damage. ;)
;D ;D ;D  like we're not already ------
The psychiatrist gave me pills last month that seem efficient, to survive and keep on buidling/drawing funny airplanes. If you need the chemical name, send me a PM.
For the P-38 here, this seems very good, go on.