Author Topic: Kettering Bug  (Read 1893 times)

Offline PFJN

  • Newly Joined - Welcome me!
Kettering Bug
« on: February 10, 2023, 02:53:04 AM »
Hi,
I finally got around to starting to 3D print my Kettering Bug model.  I got the 3D model from CG Trader for about $12 bucks, and although it doesn't look like it was specifically made for 3D printing, so far all but one part has printed out very well.  So far, I have printed the main fuselage (with the engine cylinder heads attached) and the tail pieces.  I am currently printing the cart for the craft, and will next try printing the left and right wing assemlies, each as a unit including the top and bottom wings with the struts.  After that I just need to go back and maybe reprint a piece that goes along the top front half of the fuselage.

Regards

Pat


https://www.cgtrader.com/3d-models/aircraft/military-aircraft/kettering-bug-forerunner-to-the-cruise-missile

Offline Jeffry Fontaine

  • Unaffiliated Independent Subversive...and the last person to go for a trip on a Mexicana dH Comet 4
  • Global Moderator
  • His stash is able to be seen from space...
Re: Kettering Bug
« Reply #1 on: February 10, 2023, 03:28:11 AM »
Looks promising.  What scale is this model?
"Every day we hear about new studies 'revealing' what should have been obvious to sentient beings for generations; 'Research shows wolverines don't like to be teased" -- Jonah Goldberg

Offline PFJN

  • Newly Joined - Welcome me!
Re: Kettering Bug
« Reply #2 on: February 10, 2023, 09:47:12 AM »
Hi,
That's a good question.  In general, it looks like the 3D model was done in meters, but not all the dimensions lined up with the limited data that I had on the full scale craft (though they were reasonably close).  As such, assuming the 3D model is correct, I printed it out at about 1/25 scale.   So I would say 1/25 + or - maybe a percent or two  :icon_crap: which allowed my to fit each major part (or section) within the limits of my 3D printer.
« Last Edit: February 10, 2023, 09:49:35 AM by PFJN »

Offline PFJN

  • Newly Joined - Welcome me!
Re: Kettering Bug
« Reply #3 on: February 11, 2023, 08:58:30 AM »
Hi,
Here is another picture of what I have been able to print and prime so far.  The last main piece that is printing right now is the left wing assembly.  I'm happy with how the cart printed out, but it is kind of fragle.  In looking at images and mockups on the internet I have seen some variation in how this cart looks, with some mock ups of the Bug looking close to the 3D model and some looking a little different.  I am not sure if any specific depiction is more accurate and/or the configuration of the actual cart may have varied over time, so for now I am just going to leave it mostly as is.  One small cahnge that I may make though would be to add a cross piece at the top aft end (shown to the right in the image below).  In some of the mockups that I have seen on the internet it appears that there is one, which would make sense since right now there does not appear to be anything to support the aft end of the craft in the cradle to keep the "drone" more or less level on the cart.

Regards

Pat


Offline Frank3k

  • Excession
  • Global Moderator
  • Formerly Frank2056. New upgrade!
    • My new webpage
Re: Kettering Bug
« Reply #4 on: February 12, 2023, 01:51:46 AM »
Looks interesting. Are you using an FDM or a resin printer?

Offline PFJN

  • Newly Joined - Welcome me!
Re: Kettering Bug
« Reply #5 on: February 12, 2023, 02:19:20 AM »
Hi,
I am using a Creality LD-002R resin printer.  Though I may need to clean and adjust it since my last print came out very corrupted, as shown below.  I think I need to make sure my scrren is clean, my resin is OK, and my settings are correct.  Awhile ago I tried some different type of resin and I am afraid that I may have not gotten everything set back to my more normal resin type.


Interestingly the other (basically identical) wing printed out mostly OK with just a few small glitches (mostly where the print supports got very close to the very thin wing structure)

I am going to try and clean up what I have and see if I can repair/replace the defective areas with bits of styrene and putty for now to see if that works.

Regards

Pat

Offline Frank3k

  • Excession
  • Global Moderator
  • Formerly Frank2056. New upgrade!
    • My new webpage
Re: Kettering Bug
« Reply #6 on: February 12, 2023, 02:29:58 AM »
How are you supporting these? Make sure that the stls are water-tight before slicing; you can use the 3D Builder program in Windows 10 or higher, The free PrusaSlicer or Netfabb (30 day trial) will also work. PrusaSlicer uses an older version of Netfabb. Netfabb will optimize the stl as well as fixing it, but the others will make the stl printable (if they can). The 3D builder is pretty good.

Offline PFJN

  • Newly Joined - Welcome me!
Re: Kettering Bug
« Reply #7 on: February 12, 2023, 07:51:16 AM »
Hi,

Thanks for the feedback.  I usually use ViaCAD with the 3D Printer Power Pack for my 3D work, which includes some model analyses and repair tools, but I do not remember if I ran the autorepair function for each part that I printed.  So I will try and make sure that I do that consistantly.

In the meantime I removed my resin Vat and drained it to make sure that there was no film or debris in it.  In doing so though I noticed that somehow some resin had gotten inbetween the lower Vat film and the glass window below. 
As such I am in the process of replacing the clear Vat bottom (dince there was a couple small imperfections in it that "may" have been the source of the leak, and I am also looking into either replacing or cleaning the glass window as well.

Pat

Offline Frank3k

  • Excession
  • Global Moderator
  • Formerly Frank2056. New upgrade!
    • My new webpage
Re: Kettering Bug
« Reply #8 on: February 12, 2023, 09:03:11 AM »
Resin leaks are the worst! Most printers have a "vat clean" (or equivalent) function that turns on the UV and exposes a full layer at the bottom of the vat. I just put a discarded support (with a clean, flat bottom) against a corner of the FEP (about 20mm-30mm from a corner), hold it in place and run the clean function. You end up with an exposed sheet of resin that also traps anything stuck to the FEP. Then just peel off the exposed layer (slowly) using the support "handle". There will be some unexposed resin stuck to the sheet, but I just let it cure in the Sun before disposing.


Offline PFJN

  • Newly Joined - Welcome me!
Re: Kettering Bug
« Reply #9 on: February 13, 2023, 09:04:22 AM »
Hi,
I managed to clean up my printer, so hopefully it will be back working agsain shortly.  In the mean time I've gone ahead and attached the tail surfaces and clean up the right wing assembly and lower left wing, so they just need to be replrimed and should be ready to go.  For the Top left wing, I cut away most of the messed up resin part and replaced it with styrene card and putty.  I'm hoping to use some thin styrene rod to help form the wing surface (to reklfect where the stringers are) and add a little more shape to the wing.  After that I will have to try and repair the inboard strut and then hopefully attach the wings.

I'm still looking into options for the wheels.  The full scale cart appears to have run along a traxck, kind of similar to a railroad track, and the wheels look kind of like train wheels, but with ~28 thin spokes (more like one a bicycle).  I have seen some HO scale train wheels that look almost exactly the right size but the rims and spokes may be a liitl too thick in comparison to the wheels that I have seen for the "Bug".  As such, I'm going to keep looking at my options there for a while.

Pat


Offline arkon

  • Paper Building Maestro
Re: Kettering Bug
« Reply #10 on: February 13, 2023, 04:34:49 PM »
nice! if you are making a diorama there is the perfect lady to display this with
the paper gods demand sacrifice

Offline Buzzbomb

  • Low Concentration Span, oft wanders betwixt projects
  • Accurate Scale representations of fictional stuff
    • Club and my stuff site
Re: Kettering Bug
« Reply #11 on: February 14, 2023, 05:17:17 AM »
Great project. About to start on build bit by the looks of it

Offline PFJN

  • Newly Joined - Welcome me!
Re: Kettering Bug
« Reply #12 on: February 14, 2023, 05:42:19 AM »
Hi,

Last night I started adding some of the rigging and put on an intial coat of paint to see how the colors look together.  As I have been working on the model I realized that I ahd misaligned to tail planes a little out of sync with the engine cylinders, so I cut the nose of the main body off and rotated it just a little.  In addition I am continuing to work to try and repair the damaged wing.


Pat


Offline Frank3k

  • Excession
  • Global Moderator
  • Formerly Frank2056. New upgrade!
    • My new webpage
Re: Kettering Bug
« Reply #13 on: February 14, 2023, 09:33:31 AM »
The wood colors look good!

Offline PFJN

  • Newly Joined - Welcome me!
Re: Kettering Bug
« Reply #14 on: February 20, 2023, 11:57:50 AM »
Hi,

Sorry for not posting sooner, but I had a couple hiccups along the way.  One thing that I noticed while trying to test fit everything together was that I inadvertantly didn't have the tail planes lined up correctly with the engine cylinders.  As such, I ended up cutting off the front of the main body and rotating it just a little to better align everythng.  I guess I should have added some locater marks, pins or depressions into the parts before printing them to make alignment easier, but I guess that's now a lesson for future builds  :smiley:

Next, I inadvertantly set something ontop of the cart causing it to deform.  Usually when fully cured the resin that I am using is kind of a little brittle and would ususally snap rather than flex too much, but its possible that I didn't let the piece fully cure before priming it because it is still very "springy".  Unfortunately although I was able to get the top rails of the cart mostly back to shape, the bottom bars around the edge of the cart never seemed to want to return to shape so I ended up cutting them off and replacing them with some styrene round bar that I had which was about the same diameter.

And finally, after I was able to clean the glass plate in my printer I decided to reprint my messed up wing rather than try and repair the original one.  Overall it turned out pretty well, but I inadvertantly knocked it off where I set it, when I tripped over a computer cord and ended up breaking off one of the struts.  I considered trying to just reprint the strut but noticed that the top edge of the exisiting one had broken along almost the exact same line as on my previously printed messed up wing.  So I was able to cut the strut from my messed up wing and graft it to the new wing with a little trimming here and there to get a reasonalbe fit.

After that I went ahead and added some "rigging".  I haven't really done much rigging on models before because I'm not reall good with trying to strectch sprue, but recently when I was at a local hobby shop I saw that they had styrene rod in both 0.5 and 0.25 mm thicknesses.  So I have tried using that on this build.  Since my build is about 1/25 scale, 1mm in real size equals about 1in in scale.  As such, the 0.5mm rod scales out to about 0.5inches which may be a little big for metal wiring on a craft like this, but the 0.25mm rod (0.25 inch scale) just looked a little too "faint" and fragile when I tested it.  So I am happy wih the 0.5mm stuff.

For now I need to continue to paint and clean up the parts but hope to soon start getting everything together.  Though I still haven't fully decided on how to represent the wheels on the cart yet.

Pat


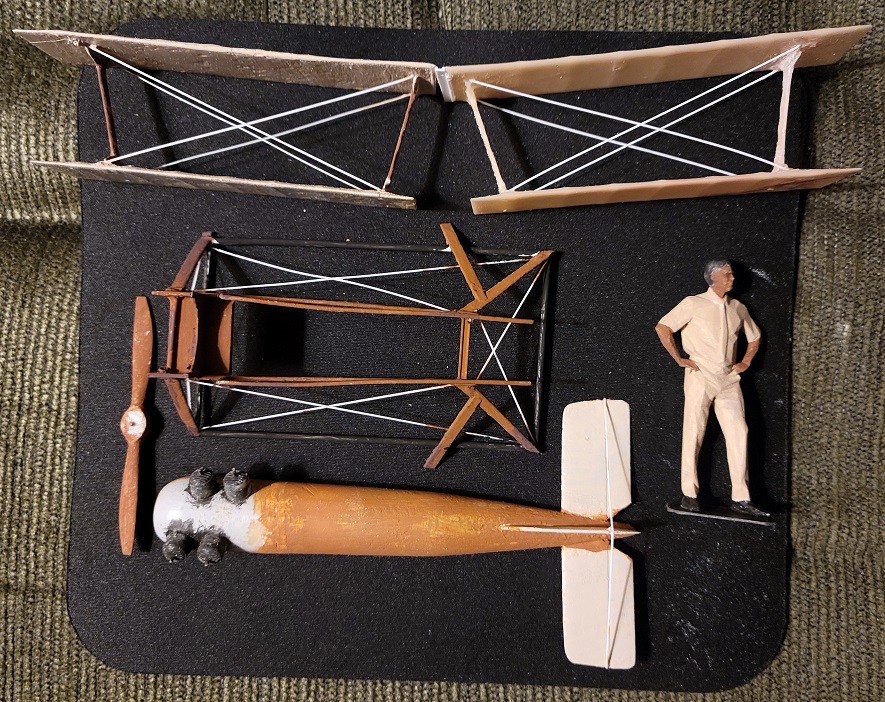
PS.  The guy shown in the image above isn't for this build but since he is printed out to 1/25 scale I placed him in the photo to help give an indication of size for the model.

Everything is looking better now though.

Offline Caveman

  • Newly Joined - Welcome me!
Re: Kettering Bug
« Reply #15 on: February 24, 2023, 01:30:59 AM »
Love this!

Offline Buzzbomb

  • Low Concentration Span, oft wanders betwixt projects
  • Accurate Scale representations of fictional stuff
    • Club and my stuff site
Re: Kettering Bug
« Reply #16 on: February 24, 2023, 05:23:48 AM »
really like what has  been done here

Offline PFJN

  • Newly Joined - Welcome me!
Re: Kettering Bug
« Reply #17 on: March 02, 2023, 12:01:30 PM »
Hi,
Sorry for the lack of updates.  I took a short break.  Now that I am back working on my build though I went ahead and printed out a scale WWI figure to go along side it.  I've done the basic painting but need to do some clean up (especially his face) and I would like to add some shadowing, contrasts, and the like.

Pat